Your roof protects your home from water damage and other elements. But even a sturdy roof will start to show signs of wear and tear over time.
Regular ground-level inspections can help homeowners catch issues before they become serious problems. These repairs include: a sagging roof, curled shingles, and leaky spots. Contact Corpus Christi Roofing CO for professional help.
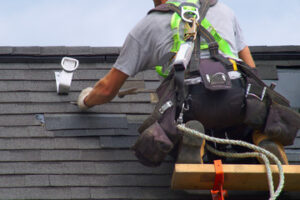
The shingles on your roof protect the home from moisture and sunlight. Over time, shingles can break down or become damaged. When this happens, water can leak into the home and cause damage to the interior and insulation. To prevent this from happening, shingle repair is important. It’s also important to keep the shingles free from debris and maintain proper ventilation. If you are noticing signs of shingle damage, it’s important to seek roof repair right away.
One of the most common types of shingle damage is corner curling. This occurs when a shingle is overexposed to the elements and begins to curl up around the edge. Luckily, this is an easy fix. If you have a few items at hand, you can stop the shingle from curling by using roofing sealant to glue it down. Just apply a bead of sealant underneath the curled shingle and then press it down flat. Weigh it down with a brick and let it sit for 24 hours to dry. Then, collect some shingle granules from your gutter and sprinkle them over the wet sealant to camouflage the repair.
Another type of shingle damage is cracking. This can occur due to age or simply wear and tear. When this occurs, it is important to use a bit of caulking to fill the crack and prevent it from spreading. You can purchase a caulking gun at your local hardware store and apply the caulk in a thin bead under the cracked shingle and press it down flat. Use a utility knife to smooth out the seams. Then, apply a second bead of sealant over the crack and spread it with the putty knife. Again, you can use crushed shingle granules to camouflage the crack repair.
A third type of shingle damage is missing shingles. This can be due to age or a storm, but it is important to replace the missing shingles as soon as possible. Ideally, you should try to find a replacement shingle that matches the current pattern of the rest of the shingles on your roof. To do so, you will need a few tools, including a pry bar, hammer, and utility knife. You can also find many videos on YouTube detailing how to install a new row of shingles.
Flashing
Flashing is an important element of any roof. It protects against water and moisture penetration in areas around roof penetrations like chimneys, skylights and vent pipes. Basically, flashing is a strip of metal that covers and seals the seams at these locations. Flashing is also used in roof valleys (the inward creases where two roof slopes meet) and at the eaves of the roof.
Flashing can be made of various materials, including aluminum, galvanized steel, copper or lead. However, the most common flashing material is galvanized steel because it’s inexpensive and relatively resistant to corrosion.
A flashing repair is a job that’s best left to a professional. This is because a qualified roofer will have the tools and knowledge to correctly repair your flashing. That being said, if you’re comfortable working on your roof, the following are some steps to follow to repair flashing:
Before beginning any repairs, check for visible signs of deterioration. Leaking and damp spots indoors may be a sign that your flashing is damaged, or missing altogether. Also look for rust or other signs of corrosion on your flashing.
If you do notice damage, you will need to replace your flashing. This will be much more expensive than just repairing the leaky area. However, it’s always better to be safe than sorry and replace your flashing before a major problem occurs.
When replacing your flashing, you’ll need to use caulking to seal the joint. The type of caulking you need will depend on the material your flashing is made from. For example, rubber caulking is good for lead and aluminum flashings. However, if your flashing is made from galvanized steel, you’ll need to use a different type of caulking.
You’ll also need to make sure that you don’t use tar or other petroleum-based products on your flashing. These will degrade the rubber and can cause leaks in the future. After installing the new flashing, you’ll want to apply a coat of roofing cement on top of it to further seal it. Also, don’t forget to install your new flashing vents, and be sure that they have a breathable membrane or screen.
Nails
Nails are used to fasten the shingles and other components to the roof. They must be long enough to penetrate the sheathing, and should be ring nails with a square head. Ring nails have a much higher withdrawal resistance than smooth shank nails. For this reason, they are preferred for nail roofing. In coastal towns and counties, galvanized steel nails are recommended instead of aluminum due to their rust-resistance in salty air.
If the nails are not driven properly or if the sheathing has warped, they may work their way up from under the shingle and cause leakage through the nail hole. This problem is called a nail pop and can occur in any shingle. It is important to fix nail pops promptly. If left uncorrected, water can infiltrate the shingle and sheathing, causing wood rot and visible ceiling leaks. Nail pops can be repaired by removing the damaged nail, replacing it with a new ring nail, and applying a roof sealant to reseal the hole.
The nail plate, also known as the corpus ulnaris, is the part of the fingernail or toenail that contains the nail bed and is embedded in the cuticle. It is made of translucent keratin protein, and it consists of several layers of dead cells compacted together. Nails can reveal a lot about our general health and wellness. They can show signs of disease such as thinning, thickening, brittleness, splitting, grooves, Mees lines, and white spots. They can also be a sign of infection with fungus such as onychomycosis. Nails can also change shape over time, such as becoming crooked (onychogryphosis) or spooning (onychodystrophy). If a nail becomes thickened or infected with fungus, it can be trimmed away by a professional.
Gutters
Gutters are a critical part of the roof system, but they are often overlooked until it’s too late. The primary function of gutters is to funnel rainwater off the roof and away from the house, which helps prevent a slew of problems including standing water in attics and other interior areas, mold and mildew growth and wood rot along fascia boards. Gutter systems also reduce soil erosion and protect the health of the local ecosystem.
The first step in roof repair is to clean out the clogged gutters. It’s best to do this in early spring before the leaves begin falling, and while it may be messy, it can also be very rewarding.
Use a tall ladder to reach inside the gutters, and scoop out all of the gunk in the troughs, and place it in a bucket secured to the ladder or on a tarp. Be sure to wear gloves. Next, flush the gutters with a hose, and watch to make sure that water exits freely.
Once you’ve removed all of the debris from the gutters, you can begin replacing the old downspouts. Use the new 3 x 4-in. drop outlet that comes with the downspout as a template to trace the outline on the hole and cut it out using tin snips or an oscillating multi-tool equipped with a metal-cutting blade.
Aside from downspouts, the other essential components of a gutter are end caps, splices and drop outlets. You can replace all of these, but it’s important to use a product that’s specifically formulated for gutters and can handle submersion for long periods of time. You can find it at most home improvement stores.
Finally, all of the seams on a metal gutter must be sealed. You can use a caulking gun to apply a gutter sealant, but be careful not to get any on the shingles themselves or you’ll risk damaging them and potentially creating leaks. Alternatively, you can use roof cement, but be sure to spread the cement over the entire area of the damaged spot. Aside from preventing leaks, this will ensure that the patch doesn’t come off with the next storm.