The Salary of a Realtor
Realtor In Tampa is a licensed real estate professional who is a member of the National Association of Realtors (NAR). They must be working under a principal/designated broker and adhere to NAR’s Code of Ethics.

The term Realtor is often used interchangeably with the words real estate agent and broker, but they have important distinctions. Read on to learn more about the differences between these professionals.
Real estate agents are the backbone of the industry. Their role involves a great deal of hard work, juggling multiple tasks, and meeting deadlines. Realtors don’t earn a regular salary; instead, they make money through commissions based on the sale or lease of a property. In addition to the monetary benefits, real estate careers also offer flexibility and the ability to work independently.
If you have a background in business and enjoy working with people, real estate might be the perfect career path for you. The industry offers a wide range of job opportunities, including residential and commercial real estate, property management, urban planning, mortgage banking, appraisal and research.
Residential real estate agents help clients buy, sell or rent single-family homes, townhouses, condominiums, and apartments. They must have excellent customer service skills and strong computer and technology knowledge. They also need to be well organized, because they deal with confidential and personal information on a daily basis.
Commercial real estate agents specialize in the commercial sector, which includes office buildings, industrial properties, and corporation farmland. They must be knowledgeable about the financial aspects of these properties and be able to calculate gross rent multipliers, capitalization rates, internal rate of return, and other financial metrics.
For those who want to focus on the rental aspect of real estate, there are opportunities to become a landlord. This requires being a good negotiator and a detail-oriented person who can manage a property efficiently. Landlords must be able to set clear expectations with tenants and provide them with quality properties that meet their needs.
Another popular option for those who want to make a living in real estate is investing in fix-and-flip properties. This requires a substantial amount of upfront capital, but it can yield very lucrative returns in the long run. Real estate investment is not for everyone; it can be a stressful, time-consuming career path with high risks.
If you have a flair for design and enjoy working with people, you can use your real estate license to become a home stager. This allows you to be more creative with your work, and it can bolster your home listing business.
Education and Training
As the real estate industry evolves, realtors must continue their education and training to keep up with new market trends. This ongoing process ensures that they can adapt quickly and maintain a competitive edge. It also allows them to keep their skills sharp and improve their customer service.
There are a variety of educational and training opportunities available to real estate agents, from online courses to mentorship programs. These options allow agents to advance their careers and increase their client base. They also help agents learn to become leaders in their community and connect with other members of the real estate profession.
For example, online real estate classes are an excellent option for aspiring agents looking to start their career. These courses provide a flexible learning experience and can be completed from anywhere in the world. Many of these courses are offered by accredited real estate schools and offer a variety of topics that cater to the needs of new and experienced agents alike.
Podcasts are another great source of educational materials for realtors. They are a convenient way to learn the latest in real estate, and they can be used to prepare for licensing exams or simply to expand one’s knowledge of the industry. These resources are available from a variety of sources, and many of them offer free or paid subscriptions.
As a licensed realtor, you will be required to complete a certain number of continuing education classes to maintain your license. The National Association of Realtors offers a wide variety of courses that are suitable for new and experienced real estate agents. You can find out more about these courses and their costs on the NAR website.
Continuing education can also give you an advantage over your competition by helping you stay up-to-date with current market trends and regulations. Investing in your career with continued education is an excellent way to grow your business and earn a reputation for professionalism.
Once you have obtained your real estate agent license, you should join the National Association of Realtors (NAR). This trade association provides a number of benefits for its members, including mentoring programs and educational opportunities. Moreover, you can benefit from the NAR’s code of ethics, which will lend credibility to your professional career.
Working Conditions
Many real estate agents work on commission only, meaning that they are paid only when they close a deal. This makes it important for them to network and stay in touch with people in their industry to make business happen. In addition, realtors must invest in professional development and continuing education to keep up with the changing market. As a result, they usually put in more hours than the typical 40-hour week and may work evenings and weekends to meet client demands.
Residential real estate agents focus on helping people buy and sell homes. They often help first-time homebuyers navigate the complexities of the process, including negotiations and inspections. They also help sellers get the best price on their home. Realtors must have a good understanding of the local housing market, as well as mortgage rates and trends.
A successful realtor will typically advance to broker status, where they can work independently of a real estate office. They can then specialize in a specific niche like commercial or industrial properties. Some brokers manage multiple offices or oversee a team of agents. Realtors also may choose to become part of a trade association like the National Association of Realtors (NAR) and adhere to its strict code of ethics.
Some real estate agents are self-employed contractors and therefore set their own working hours. This flexibility is beneficial because it can allow them to balance family and other obligations while still meeting client demands. However, it can also lead to high levels of stress and fatigue if an agent does not have a strong support system in place.
Whether they are employed or self-employed, real estate agents and brokers are generally expected to give back to their communities through charitable activities and service work. Some even have a dedicated charity arm that works to improve the quality of life for people in need. Realtors are a valuable part of any community and serve an important role in the real estate industry. It is vital that they are held to a high standard of ethics and conduct.
Salary
The salary of a realtor can vary widely depending on the type of property they sell, location and their niche. Realtors who specialize in luxury properties can earn much more than those who work with average homes. The salary of a real estate agent can also depend on whether they choose to focus on commercial or residential real estate.
Real estate agents earn money through commissions, which are typically a percentage of the sale price of the property. Most real estate agents work under a broker, who pays them and ensures that they comply with local and national real estate laws. Brokers may also earn their income through flat fees for services such as property management or appraisal. Some real estate agents also offer mortgage financing, which can make them eligible for additional earnings.
Unlike salaried employees, real estate agents typically do not receive benefits such as healthcare or paid time off. Those who work for a large brokerage firm often have the option to join their company’s health insurance plan or retirement program, but most independent agents must purchase their own coverage or set up their own accounts (such as SEP or IRA).
The first year of a new real estate agent’s career usually produces the lowest income because it takes time to build relationships with clients and gain experience. However, by staying persistent and investing in professional development opportunities, an agent can increase their income significantly over the course of a few years.
In addition to commissions, realtors can also earn extra income by completing special tasks such as inspections or appraisals. Other sources of potential income include working with land developers or focusing on investment property.
Real estate agents who focus on commercial real estate can expect higher salaries than those who work in residential real estate, as the sales prices of commercial properties are usually much more expensive. In addition, real estate agents who focus on a particular sector of the market can earn more than those who work in a general market because they have a deep understanding of that specific area.
Patio Construction – A Quick, Quiet, and Cost-Effective Way to Transform Your Outdoor Living Space
Patio Construction Richmond VA is an important step in transforming your outdoor space. When you have a good concrete contractor, the process can be quick, quiet, and cost-effective.

The size and complexity of the patio will influence its construction timeline. Additional features like a fire pit or an outdoor kitchen may add time to the project as well.
A patio is a paved outdoor area adjoining a house at ground level, usually used for dining or recreation. Patios are constructed in a variety of materials including concrete, stone, brick or pavers and may be decorated with plants and outdoor furniture.
Similar to a porch, it is important to have the patio site fully prepared before any construction begins. The site will need to be leveled and any existing trees, bushes or plants removed. It is also recommended to have a locate done to ensure that the new patio doesn’t interfere with any underground utilities.
Once the site has been prepped, it is time to start laying the base. A layer of crusher run (also known as hard pack, processed gravel or road pack) is laid for the base. A rule of thumb that works well for us is a cubic yard of crushed rock will supply 80 square feet at 3 inches thick unpacked. A 1-inch-deep layer of coarse or concrete sand is then spread over the top of the base and screeded to create a perfectly level surface.
The pavers are then positioned to form the desired patio shape. The gap between each paver is filled with course washed concrete sand or we recommend using a polymeric jointing sand such as Techniseal NextGel and swept clean. Once the patio is positioned and sanded, a plate compactor is used to tamp down the pavers and then a hose is used to water in the sand/poly sand.
Marking
A patio is a paved outdoor area adjoining the house at ground level, often used for dining. It’s usually constructed from concrete, bricks or cobblestones. Patios are typically surrounded by lush landscaping and can be decorated with outdoor furniture.
Patios are a great way to extend living space into the backyard, but homeowners can go even further and create a multi-leveled outdoor entertaining area complete with a fire pit, multiple walkways and a hot tub. These features, however, add time and cost to the project.
In order to get your backyard project started, it’s important that you mark where your patio will be located. Use marking spray paint to outline the layout, following your drawn up plan. Once you’ve marked out your patio, it’s also a good idea to request a locate of underground facilities as this will prevent costly mistakes in the future.
A protractor and a carpenter’s square will help you make sure that your corners are straight, as well as ensure that the angles between your blocks are correct. An angle scribe is also a handy tool to have for reproducing specific angles and cutting pavers or blocks precisely for your patio construction. This will ensure that your new outdoor space is perfect and will look flawless once it’s finished. Using the right tools will save you time, money and headaches in the long run.
Excavation
The patio construction process typically begins with excavating the site. Depending on the design of your patio, this may require digging down to at least 8 inches for a paver base or 6 inches for a poured concrete slab. In some cases, builders also need to slope the area away from the house. This is to ensure that all water drains from the patio, avoiding the potential for flood damage.
When digging, professionals take care not to disrupt any underground utilities, such as water lines, gas pipes or electrical wires. Before starting excavation, they notify the local utility company through a free service called 811. They then wait for workers to mark the underground utilities with paint or flags before beginning to dig.
During the excavation process, builders remove any large rocks or tree roots from the patio site. They also use a plate compactor to compact the soil as they go. This is important, as a poorly-compacted soil will undermine the strength and stability of the new patio.
During the excavation phase, professionals also determine what type of base material will be used for the patio. They can choose from several options, including crushed granite, decomposed granite or gravel. Before adding the base material, they tamp it down with a hand or power tamper. This helps to achieve a level surface and reduce the amount of future maintenance required for the patio.
Pouring the Sub-Base
When laying paving, the sub-base is a very important part of the overall project. Without a good sub-base, paving can move and cause damage over time. This is especially true if the material used is not of sufficient quality.
The correct sub-base layer is strong enough to support the load of vehicles and pedestrians over a long period. It will also help to avoid water pooling beneath the paving. The sub-base should be a crushed stone type that is certified as MOT Type 1 (or DTP1 for short). This is an angular material which will lock together when compacted, making it a stable base to support the paving.
Once the soil has been dug and leveled, a layer of MOT Type 1 should be laid over it. This should be tamped down to compact it. This can be done with a hand tamper or with a power tamper. The sub-base should then be checked and leveled. It should be made to slope away from any buildings, as this will prevent water from splashing onto the paving and potentially causing damage.
When choosing a concrete contractor to work on your patio, always check out their credentials. A good company will have a portfolio of past projects that you can look through. You should also make sure that they are insured and licensed. If they don’t, it could be a sign of poor workmanship.
Pouring the Concrete
Patios come in many different shapes, sizes, and styles. Some are free standing, while others are part of a house or deck. They can be built of concrete, wood, or a combination of materials. The type of material determines the construction process, cost and longevity of the patio.
Before the concrete is poured, a layer of leveling sand is spread over the excavation site. This helps the patio to maintain its shape and prevents weed growth. The sand is often mixed with a small amount of water to make it easier to work with.
Once the sand is leveled, the pour frame is set into place. The builders may use a special spray to ensure that the frame is securely set. They also spray a release agent on the frame to ensure that it can be removed without damaging the concrete.
A small amount of concrete mix is then poured into the form. This is usually a standard patio mix with 3,000 pounds per square inch (psi). For foundations, however, it’s important to use stronger concrete at 3,500 or more psi.
Once the concrete is poured, it’s smoothed out with a magnesium hand float and swept to create a nice, even surface. It’s also grooved every 4 to 6 feet for control joints. These allow the concrete to expand and contract with temperature changes, preventing surface cracks. The builder will then use a broom to remove any remaining sand and dirt from the surface of the concrete.
Dry Laying
A dry-laid patio involves no concrete slab base and instead relies on compacted layers of gravel as a foundation for the stones. The spaces between the stones are filled with traditional sand for a more natural look or polymeric sand for more durability and ease of maintenance. While not as stable as a mortar-set patio, the gravel base is often easier to install and less expensive than the concrete pad required by a wet-laid installation.
Once the gravel base has been spread, a layer of builder’s sand is placed over it and screeded to create a perfectly level surface. A garden hose is used to wet the sand, which helps it settle and creates a strong, solid base for the flagstone pavers to be laid on top of.
Then, starting on one side of the patio, stones are placed and tamped down using a plate compactor or rented hand tamper. The patio stones should be as close together as possible. Large gaps between the stones will allow weeds to grow and can also make the surface uneven.
This is a critical stage of the process, as the masons must ensure that the stones are all matched and fit together properly. During this phase, the masons conduct final quality control and photos of each stone to identify their visual/physical status and selection and record this information on the stones before they are packed for shipment.
Tips For Painting Inside Of Cabinets
Painting Inside Of Cabinets give them a statement-making burst of color. Follow this strategy to ensure an even paint job that withstands daily wear and tear.
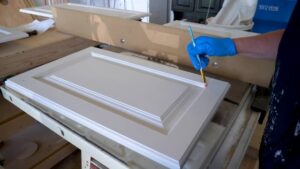
Start by removing the doors and labeling where the hinges go for easy reassembly. Next, remove adjustable shelves (if possible).
Sand all surfaces then apply a stain blocking oil-based primer. Let it dry before proceeding with your finish coats.
Before starting, make sure the cabinets are clean and free of dust. Using a sponge and soapy water, wipe down all surfaces of the cabinet interiors to remove any dirt, grease or food residue. If there are any cracks or stains that need to be filled in, do so now and let them dry completely. This step is critical for a long-lasting paint job.
If you haven’t already done so, sand all of the surfaces you plan to paint. Then vacuum or use a lint-free rag to wipe away any dust and debris left behind. Any small particles that aren’t cleaned up can waft into the painted surface and cause a bump or flaw in your finished product.
Depending on the paint you’re using, it may require a special primer or need to be primed before applying the new color. Read the label to determine the best way to prepare the cabinets for painting. A high-quality, latex primer is often sufficient if the cabinet interiors are in good condition, but oil-based alkyd primers and shellacs are also common options. Before applying your primer, remember that it will outgas fumes for a while afterward, so choose an area of the house that can stay closed to reduce exposure.
Once the primer is dry, you’re ready to start painting! Work on a table to reduce drips and runny spots, and apply two coats to ensure a uniform finish. Be sure to allow each coat to dry fully between applications and to follow the product’s maximum recoat time before placing anything back into your cabinets.
Unlike exterior cabinet doors, it’s best to paint the inside of cabinet drawers and shelves with a brush rather than a roller to get better coverage on curved surfaces and corners. Start with the bottoms of the cabinet boxes and then move on to the sides of the cabinets, working on one side at a time so you can turn them over before moving on to the other side. Keep a drop cloth under each section to catch any drips and protect countertops and floors from overspray.
Primer
If you’re going to go through the trouble of painting your cabinet doors and drawers, it’s best to give them a good once-over with a quality primer. Primer is like the glue layer that connects your paint to your cabinets and helps it stick really well. It’s also what helps to prevent bleed-through (when stains or paint colors from underlying surfaces seep through and impact the new coat).
Choose a good primer for your cabinets, based on the material they’re made from. Particleboard and medium-density fiberboard tend to soak up water, so a waterproof or mildew-resistant primer is a smart choice in moisture-prone areas.
It’s important to sand before priming and painting because this gives the primer something to adhere to, but be careful not to go too overboard; you want a smooth surface to work with, not an ugly mess. When in doubt, use a sanding block and a light touch to remove any dust or dirt particles that might mar your newly-primed surface. Once the sanding is done, vacuum the cabinet doors and drawers to ensure that no bits of sanding dust get in the way of your work.
There are several different types of primers, ranging from water-based to oil-based to shellac-based. Each one has its own set of properties and pros and cons, but in general, a water-based primer is a DIY favorite because it dries quickly, emits minimal odor, and cleans up easily. Oil-based odor- and stain-blocking primers perform well and are able to hide previous finishes, but they may require longer dry times than other options.
Whether you opt for a water-based or oil-based primer, make sure that it’s compatible with your chosen cabinet finish. It’s best to wait 16-24 hours before you apply your first coat of paint, allowing the primer and then the paint to cure completely. After your first coat is on and dried, sand lightly again with a medium-grit sanding block to achieve a smooth surface that’ll look great and hold onto your desired color for a long time.
Paint
When it comes to painting interior cabinets, the best choice is oil-based paint. It’s easy to find, DIY-friendly and has a smooth, durable finish that can withstand the wear and tear of frequent opening and closing of cabinet doors. However, it does have a strong odor, takes longer to dry and can yellow over time. If you’re planning to use latex, choose a synthetic brush, since the water-based formula may swell the bristles of natural brushes. It’s also important to remove all hardware and fill any screw holes for a smoother, even finish.
If you’re using a dark shade, select a primer designed for that color to prevent the paint from showing through and create a patchy finish. If you’re redoing your cabinets with a light shade, a white or cream primer will keep discoloration, splotches and visible knots at bay.
For a smooth, durable finish, apply two coats of the chosen cabinet paint to the entire surface. If you’re using a roller, make sure to back-brush the rolled paint to help smooth out any splotches and ensure a consistent, clean look. Using a brush, start at the top of your cabinets and work your way down to avoid any cross-over of brush strokes. Be sure to paint the back of the cabinets as well and to allow for the proper curing time before reassembling your cabinets.
Once the first coat of paint has dried, sand the cabinets lightly with 220-grit sandpaper to smooth any rough areas and give your second coat an even surface. Then, if necessary, apply an additional coat of paint. If you’re painting over an old oil-based finish, make sure to sand in between coats to ensure a smooth, even finish.
If a brush or roller seem like too much work, consider renting a paint sprayer, which is easy to use, reasonably affordable and guarantees a smooth, professional finish. Just be aware that the air movement from the sprayer will generate fumes, so it’s essential to have your work space adequately ventilated. Keep the windows open and turn on fans to speed up the drying process, and be careful not to touch or slam cabinet doors until the paint has cured to a hard, durable surface.
Finish
In the past, oil paint was the go-to choice for cabinet interiors because it offers good adhesion, durability, and a smooth finish. However, it requires solvents for cleaning up and has a strong, unpleasant odor. It can also yellow over time. Latex, on the other hand, is easier to clean and has less of a odor. However, it doesn’t dry as quickly as oil-based paint and can be more susceptible to stains.
If you’re deciding between oil-based and latex paint for your cabinets, it is important to choose the right primer. Look for one that is designed specifically for the color you are painting and formulated to prevent staining. If you’re painting light colors, use a primer that is formulated for white or cream; if you’re going with dark colors, get a stain-blocking primer for best results.
Once the primer has dried, you can begin painting the cabinets with your chosen paint. For the best results, you should choose a semi-gloss or satin finish that is easy to wipe down. Avoid matte finishes, which are hard to clean and can show smudges and fingerprints easily.
You can also consider using an acrylic paint with a urethane topcoat to create an enamel-like product that will resist high temperatures and protect the cabinets from wear and tear. This option is especially great if you have cabinets over your stove, which will experience high temperatures regularly.
Another option is to find an alkyd paint that dries to a hard finish that’s easy to wipe down and clean. Look for a formula that’s low in VOCs (volatile organic compounds) and doesn’t require the use of turpentine or mineral spirits to clean up, as many old-fashioned alkyd paints used to do.
Once the paint has dried, you can reattach the cabinet doors and hardware. Be sure to wait a few days for the cabinets to fully cure to a durable, weather-resistant finish. And remember, until the cabinets are cured, be careful not to slam or scrape them with anything.