Painting Inside Of Cabinets give them a statement-making burst of color. Follow this strategy to ensure an even paint job that withstands daily wear and tear.
Start by removing the doors and labeling where the hinges go for easy reassembly. Next, remove adjustable shelves (if possible).
Sand all surfaces then apply a stain blocking oil-based primer. Let it dry before proceeding with your finish coats.
Before starting, make sure the cabinets are clean and free of dust. Using a sponge and soapy water, wipe down all surfaces of the cabinet interiors to remove any dirt, grease or food residue. If there are any cracks or stains that need to be filled in, do so now and let them dry completely. This step is critical for a long-lasting paint job.
If you haven’t already done so, sand all of the surfaces you plan to paint. Then vacuum or use a lint-free rag to wipe away any dust and debris left behind. Any small particles that aren’t cleaned up can waft into the painted surface and cause a bump or flaw in your finished product.
Depending on the paint you’re using, it may require a special primer or need to be primed before applying the new color. Read the label to determine the best way to prepare the cabinets for painting. A high-quality, latex primer is often sufficient if the cabinet interiors are in good condition, but oil-based alkyd primers and shellacs are also common options. Before applying your primer, remember that it will outgas fumes for a while afterward, so choose an area of the house that can stay closed to reduce exposure.
Once the primer is dry, you’re ready to start painting! Work on a table to reduce drips and runny spots, and apply two coats to ensure a uniform finish. Be sure to allow each coat to dry fully between applications and to follow the product’s maximum recoat time before placing anything back into your cabinets.
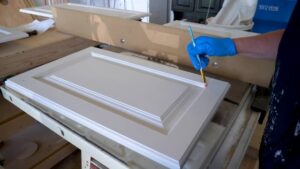
Unlike exterior cabinet doors, it’s best to paint the inside of cabinet drawers and shelves with a brush rather than a roller to get better coverage on curved surfaces and corners. Start with the bottoms of the cabinet boxes and then move on to the sides of the cabinets, working on one side at a time so you can turn them over before moving on to the other side. Keep a drop cloth under each section to catch any drips and protect countertops and floors from overspray.
Primer
If you’re going to go through the trouble of painting your cabinet doors and drawers, it’s best to give them a good once-over with a quality primer. Primer is like the glue layer that connects your paint to your cabinets and helps it stick really well. It’s also what helps to prevent bleed-through (when stains or paint colors from underlying surfaces seep through and impact the new coat).
Choose a good primer for your cabinets, based on the material they’re made from. Particleboard and medium-density fiberboard tend to soak up water, so a waterproof or mildew-resistant primer is a smart choice in moisture-prone areas.
It’s important to sand before priming and painting because this gives the primer something to adhere to, but be careful not to go too overboard; you want a smooth surface to work with, not an ugly mess. When in doubt, use a sanding block and a light touch to remove any dust or dirt particles that might mar your newly-primed surface. Once the sanding is done, vacuum the cabinet doors and drawers to ensure that no bits of sanding dust get in the way of your work.
There are several different types of primers, ranging from water-based to oil-based to shellac-based. Each one has its own set of properties and pros and cons, but in general, a water-based primer is a DIY favorite because it dries quickly, emits minimal odor, and cleans up easily. Oil-based odor- and stain-blocking primers perform well and are able to hide previous finishes, but they may require longer dry times than other options.
Whether you opt for a water-based or oil-based primer, make sure that it’s compatible with your chosen cabinet finish. It’s best to wait 16-24 hours before you apply your first coat of paint, allowing the primer and then the paint to cure completely. After your first coat is on and dried, sand lightly again with a medium-grit sanding block to achieve a smooth surface that’ll look great and hold onto your desired color for a long time.
Paint
When it comes to painting interior cabinets, the best choice is oil-based paint. It’s easy to find, DIY-friendly and has a smooth, durable finish that can withstand the wear and tear of frequent opening and closing of cabinet doors. However, it does have a strong odor, takes longer to dry and can yellow over time. If you’re planning to use latex, choose a synthetic brush, since the water-based formula may swell the bristles of natural brushes. It’s also important to remove all hardware and fill any screw holes for a smoother, even finish.
If you’re using a dark shade, select a primer designed for that color to prevent the paint from showing through and create a patchy finish. If you’re redoing your cabinets with a light shade, a white or cream primer will keep discoloration, splotches and visible knots at bay.
For a smooth, durable finish, apply two coats of the chosen cabinet paint to the entire surface. If you’re using a roller, make sure to back-brush the rolled paint to help smooth out any splotches and ensure a consistent, clean look. Using a brush, start at the top of your cabinets and work your way down to avoid any cross-over of brush strokes. Be sure to paint the back of the cabinets as well and to allow for the proper curing time before reassembling your cabinets.
Once the first coat of paint has dried, sand the cabinets lightly with 220-grit sandpaper to smooth any rough areas and give your second coat an even surface. Then, if necessary, apply an additional coat of paint. If you’re painting over an old oil-based finish, make sure to sand in between coats to ensure a smooth, even finish.
If a brush or roller seem like too much work, consider renting a paint sprayer, which is easy to use, reasonably affordable and guarantees a smooth, professional finish. Just be aware that the air movement from the sprayer will generate fumes, so it’s essential to have your work space adequately ventilated. Keep the windows open and turn on fans to speed up the drying process, and be careful not to touch or slam cabinet doors until the paint has cured to a hard, durable surface.
Finish
In the past, oil paint was the go-to choice for cabinet interiors because it offers good adhesion, durability, and a smooth finish. However, it requires solvents for cleaning up and has a strong, unpleasant odor. It can also yellow over time. Latex, on the other hand, is easier to clean and has less of a odor. However, it doesn’t dry as quickly as oil-based paint and can be more susceptible to stains.
If you’re deciding between oil-based and latex paint for your cabinets, it is important to choose the right primer. Look for one that is designed specifically for the color you are painting and formulated to prevent staining. If you’re painting light colors, use a primer that is formulated for white or cream; if you’re going with dark colors, get a stain-blocking primer for best results.
Once the primer has dried, you can begin painting the cabinets with your chosen paint. For the best results, you should choose a semi-gloss or satin finish that is easy to wipe down. Avoid matte finishes, which are hard to clean and can show smudges and fingerprints easily.
You can also consider using an acrylic paint with a urethane topcoat to create an enamel-like product that will resist high temperatures and protect the cabinets from wear and tear. This option is especially great if you have cabinets over your stove, which will experience high temperatures regularly.
Another option is to find an alkyd paint that dries to a hard finish that’s easy to wipe down and clean. Look for a formula that’s low in VOCs (volatile organic compounds) and doesn’t require the use of turpentine or mineral spirits to clean up, as many old-fashioned alkyd paints used to do.
Once the paint has dried, you can reattach the cabinet doors and hardware. Be sure to wait a few days for the cabinets to fully cure to a durable, weather-resistant finish. And remember, until the cabinets are cured, be careful not to slam or scrape them with anything.