Home » Posts tagged 'kitchen remodeling'
Tag Archives: kitchen remodeling
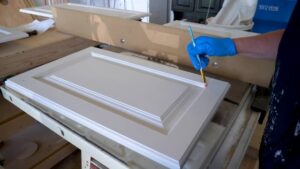
Tips For Painting Inside Of Cabinets
Painting Inside Of Cabinets give them a statement-making burst of color. Follow this strategy to ensure an even paint job that withstands daily wear and tear.
Start by removing the doors and labeling where the hinges go for easy reassembly. Next, remove adjustable shelves (if possible).
Sand all surfaces then apply a stain blocking oil-based primer. Let it dry before proceeding with your finish coats.
Before starting, make sure the cabinets are clean and free of dust. Using a sponge and soapy water, wipe down all surfaces of the cabinet interiors to remove any dirt, grease or food residue. If there are any cracks or stains that need to be filled in, do so now and let them dry completely. This step is critical for a long-lasting paint job.
If you haven’t already done so, sand all of the surfaces you plan to paint. Then vacuum or use a lint-free rag to wipe away any dust and debris left behind. Any small particles that aren’t cleaned up can waft into the painted surface and cause a bump or flaw in your finished product.
Depending on the paint you’re using, it may require a special primer or need to be primed before applying the new color. Read the label to determine the best way to prepare the cabinets for painting. A high-quality, latex primer is often sufficient if the cabinet interiors are in good condition, but oil-based alkyd primers and shellacs are also common options. Before applying your primer, remember that it will outgas fumes for a while afterward, so choose an area of the house that can stay closed to reduce exposure.
Once the primer is dry, you’re ready to start painting! Work on a table to reduce drips and runny spots, and apply two coats to ensure a uniform finish. Be sure to allow each coat to dry fully between applications and to follow the product’s maximum recoat time before placing anything back into your cabinets.
Unlike exterior cabinet doors, it’s best to paint the inside of cabinet drawers and shelves with a brush rather than a roller to get better coverage on curved surfaces and corners. Start with the bottoms of the cabinet boxes and then move on to the sides of the cabinets, working on one side at a time so you can turn them over before moving on to the other side. Keep a drop cloth under each section to catch any drips and protect countertops and floors from overspray.
Primer
If you’re going to go through the trouble of painting your cabinet doors and drawers, it’s best to give them a good once-over with a quality primer. Primer is like the glue layer that connects your paint to your cabinets and helps it stick really well. It’s also what helps to prevent bleed-through (when stains or paint colors from underlying surfaces seep through and impact the new coat).
Choose a good primer for your cabinets, based on the material they’re made from. Particleboard and medium-density fiberboard tend to soak up water, so a waterproof or mildew-resistant primer is a smart choice in moisture-prone areas.
It’s important to sand before priming and painting because this gives the primer something to adhere to, but be careful not to go too overboard; you want a smooth surface to work with, not an ugly mess. When in doubt, use a sanding block and a light touch to remove any dust or dirt particles that might mar your newly-primed surface. Once the sanding is done, vacuum the cabinet doors and drawers to ensure that no bits of sanding dust get in the way of your work.
There are several different types of primers, ranging from water-based to oil-based to shellac-based. Each one has its own set of properties and pros and cons, but in general, a water-based primer is a DIY favorite because it dries quickly, emits minimal odor, and cleans up easily. Oil-based odor- and stain-blocking primers perform well and are able to hide previous finishes, but they may require longer dry times than other options.
Whether you opt for a water-based or oil-based primer, make sure that it’s compatible with your chosen cabinet finish. It’s best to wait 16-24 hours before you apply your first coat of paint, allowing the primer and then the paint to cure completely. After your first coat is on and dried, sand lightly again with a medium-grit sanding block to achieve a smooth surface that’ll look great and hold onto your desired color for a long time.
Paint
When it comes to painting interior cabinets, the best choice is oil-based paint. It’s easy to find, DIY-friendly and has a smooth, durable finish that can withstand the wear and tear of frequent opening and closing of cabinet doors. However, it does have a strong odor, takes longer to dry and can yellow over time. If you’re planning to use latex, choose a synthetic brush, since the water-based formula may swell the bristles of natural brushes. It’s also important to remove all hardware and fill any screw holes for a smoother, even finish.
If you’re using a dark shade, select a primer designed for that color to prevent the paint from showing through and create a patchy finish. If you’re redoing your cabinets with a light shade, a white or cream primer will keep discoloration, splotches and visible knots at bay.
For a smooth, durable finish, apply two coats of the chosen cabinet paint to the entire surface. If you’re using a roller, make sure to back-brush the rolled paint to help smooth out any splotches and ensure a consistent, clean look. Using a brush, start at the top of your cabinets and work your way down to avoid any cross-over of brush strokes. Be sure to paint the back of the cabinets as well and to allow for the proper curing time before reassembling your cabinets.
Once the first coat of paint has dried, sand the cabinets lightly with 220-grit sandpaper to smooth any rough areas and give your second coat an even surface. Then, if necessary, apply an additional coat of paint. If you’re painting over an old oil-based finish, make sure to sand in between coats to ensure a smooth, even finish.
If a brush or roller seem like too much work, consider renting a paint sprayer, which is easy to use, reasonably affordable and guarantees a smooth, professional finish. Just be aware that the air movement from the sprayer will generate fumes, so it’s essential to have your work space adequately ventilated. Keep the windows open and turn on fans to speed up the drying process, and be careful not to touch or slam cabinet doors until the paint has cured to a hard, durable surface.
Finish
In the past, oil paint was the go-to choice for cabinet interiors because it offers good adhesion, durability, and a smooth finish. However, it requires solvents for cleaning up and has a strong, unpleasant odor. It can also yellow over time. Latex, on the other hand, is easier to clean and has less of a odor. However, it doesn’t dry as quickly as oil-based paint and can be more susceptible to stains.
If you’re deciding between oil-based and latex paint for your cabinets, it is important to choose the right primer. Look for one that is designed specifically for the color you are painting and formulated to prevent staining. If you’re painting light colors, use a primer that is formulated for white or cream; if you’re going with dark colors, get a stain-blocking primer for best results.
Once the primer has dried, you can begin painting the cabinets with your chosen paint. For the best results, you should choose a semi-gloss or satin finish that is easy to wipe down. Avoid matte finishes, which are hard to clean and can show smudges and fingerprints easily.
You can also consider using an acrylic paint with a urethane topcoat to create an enamel-like product that will resist high temperatures and protect the cabinets from wear and tear. This option is especially great if you have cabinets over your stove, which will experience high temperatures regularly.
Another option is to find an alkyd paint that dries to a hard finish that’s easy to wipe down and clean. Look for a formula that’s low in VOCs (volatile organic compounds) and doesn’t require the use of turpentine or mineral spirits to clean up, as many old-fashioned alkyd paints used to do.
Once the paint has dried, you can reattach the cabinet doors and hardware. Be sure to wait a few days for the cabinets to fully cure to a durable, weather-resistant finish. And remember, until the cabinets are cured, be careful not to slam or scrape them with anything.
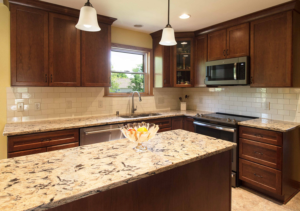
How to Plan a Successful Kitchen Remodeling
If your kitchen feels dated, it’s time for a remodel. New appliances are a must, but you should also consider other unique storage elements to make it easier to manage your cookware and dishes.
A minor remodel is a cosmetic refresh, while a major remodel includes changing the layout and possibly moving pipes*. Contact Kitchen Remodeling Richmond VA now!
If you’re planning a kitchen remodel, you have a lot to think about. The project can be physically and financially demanding, especially if it drags on. In addition, it can be difficult to see the end result. Many homeowners end up with a kitchen that they don’t like or find unworkable, simply because they didn’t take the time to properly plan their remodel.
There’s a lot to consider, from selecting the right paint colors to creating an effective layout. You may also need to choose new appliances, which can add a significant chunk to your budget. This is the time to research brands, models, installation methods, maintenance and care requirements, and prices. It’s helpful to keep track of your options in a spreadsheet or other document.
The planning stage is also a good time to decide whether you’ll work with a general contractor or designer. These professionals will likely get you better rates on materials and other purchases throughout the remodel process, as well as offer advice on what ideas are realistic and which ones are not.
You’ll also want to determine the scope of your project, which Ariana Lovato, owner of Honeycomb Design in Shell Beach, CA, describes as “the extent of the renovation.” This could range from a cosmetic refresh to a complete overhaul with wall removal and relocation of utilities.
If you’re going to do any heavy renovation work on rooms above your kitchen, you should do it before the kitchen is remodeled. Otherwise, the fresh paint will crack under the vibration of construction and plumbing work. Additionally, moving pipes can add quite a bit to the project’s cost. Likewise, you should also address any storage needs before remodeling your kitchen.
Decide on a Budget
The kitchen is an important part of any home, but it can be one of the most expensive rooms to remodel. That’s why it’s important to determine your budget early and stick with it.
You can find a variety of tools online that help you create a budget for your kitchen remodeling project. These budget planners are a great way to keep track of expenses throughout the project and can save you a lot of money in the long run.
Before you start the project, it’s also good to know how much an average kitchen remodel costs in your area. This will help you set a realistic budget and prevent you from getting carried away with extravagant features.
It’s recommended that you set aside a percentage of your kitchen remodel budget for unexpected expenses. These can include unforeseen problems like mold in the walls or outdated wiring that requires repair. You can also encounter hidden costs such as extra labor or materials needed to complete the job.
These surprises may add up and push your budget beyond its limits. To avoid overspending, you can always ask a professional to check for any issues before starting the work. This will prevent unexpected expenses from popping up and causing financial stress.
Another way to lower your kitchen remodel costs is to stay within your budget by making smart choices about materials. For example, instead of splurging on a custom cabinet, you can choose a pre-fabricated model that is just as functional and stylish. You can also opt for cheaper countertops or tile that won’t break the bank. You can even save by shopping at thrift stores and reuse centers for discounted items.
Select a Design
One of the most important decisions you will make is how your kitchen will look. The style you choose will determine a lot of the other design choices you must make, such as color scheme, materials, and more. If you want a bold and vibrant space, for instance, splashy backsplash tile or fancy flooring can serve as your focal point. From there, select other design elements that will complement it, such as soft shades on cabinets and simple window treatments.
If you are going for a more modern and on-trend style, wooden countertops, for example, offer both character and warmth. They also are versatile and can be paired with any number of cabinet colors and finishes. Other design elements to consider include whether you want your space to be open to the rest of the house or tucked away in a corner, how big or small you want the room to be, and more.
It’s also a good idea to think about the overall layout of your new kitchen at this stage, especially if you are making significant changes to the floor plan. Keeping in mind the time-tested design concept known as “The Kitchen Triangle” can help you decide where to place your sink, refrigerator, and stove or cooktop. You’ll want to ensure these areas are close together so they are easily accessible when cooking.
At this stage, you should also think about storage solutions. Things like a pull-out pan rack or extra shelving in the cabinets can save you space and provide easy access to items. You might also want to consider adding a lazy susan or other organizational features that will make your new kitchen more functional and enjoyable to be in.
Hire a Contractor
A kitchen remodeling project is a big undertaking, and hiring the right contractor is essential to its success. Start by assembling a list of qualified candidates. Obtain referrals from friends and family, review online reviews and visit contractor websites to learn more about their experience and qualifications. Also, ask potential contractors to provide you with their license and insurance information, as well as an estimate of how long the renovation will take.
During your initial phone and in-person meetings with a few contractor candidates, be sure to clarify the type of work you’re hoping for. For example, are you interested in a simple paint job or a complete overhaul? Do you want to relocate walls or change the footprint of your kitchen? The answer to these questions will impact your budget and timeline.
When discussing the project scope, find out whether the contractor will handle all of the remodel work themselves or subcontract out some of it to other companies or professionals. A contractor who subcontracts out some of the work is less likely to take on too many projects at once, which can affect the overall timeline of your own kitchen remodel. Ask about their process for choosing subcontractors, how they manage them and any insurance liability issues that might arise.
A reliable contractor will be open and honest about the project timeline. They should be able to explain any setbacks that could arise, such as shipment delays for building materials or unexpected plumbing or electrical layout problems. They should also be able to provide you with a timeline for when you can use your kitchen again. In addition, ask if they have a daily point person who will communicate with you and oversee the work.
Make the Decision to Do It Yourself
One of the biggest decisions to make when you remodel your kitchen is whether you will do it yourself or hire a contractor. Kitchen remodeling can be a complex process, and there are many steps that must be completed in order to complete the project successfully. For most people, this is a job best left to professionals who can ensure the safety of their workers as well as the quality of the finished product.
If you decide to do the work yourself, it’s important to plan ahead and prepare accordingly. For example, if you are planning on installing new flooring, it’s important to make sure you have the correct tools and materials on hand before starting the job. You should also be aware of the amount of time it will take to do each task. For instance, installing tile can be a complicated process that takes a lot of time to complete. Fortunately, there are other flooring options that are much easier to install and can save you a lot of time and money.
Another important consideration when deciding to do the work yourself is the fact that a kitchen can be very dangerous to work on if you’re not experienced in plumbing and electrical work. Even standard household electrical voltage can be deadly, and a simple wiring error could have devastating consequences. For these reasons, it’s usually best to leave this step of the project to a professional who can ensure that all of the work is done properly and up to code.
Despite the challenges and costs associated with kitchen remodeling, it’s a good investment that can add value to your home. By spending your renovation dollars wisely, you can enjoy your new kitchen for years to come while maximizing the return on your investment when it comes time to sell.